|
|
|
|
Adding a Web Server
To add a web server:
Log on to HC panel.
From
the left menu click General, and
then Server Manager.
The Server Manager page is displayed.
Click
Add Server.
The Add Server page is displayed.
Click the Friendly Name arrow and select the required server from the drop-down list box.
|
|
|
Under
Server Role, select the Web Server check box.
|
|
Every server can have one or more role(s) in the cluster. These roles need to be set every time a new server is added to the cluster. |
Under Role Capacity, type the number of Websites supported by the server.
Under Purposing, click the arrow and select the end user for the server from the drop-down list box.
|
|
The server role added in the cluster can be used either dedicatedly for a Reseller or for shared hosting. A role dedicated to a Reseller can not be used for any other user. |
|
|
|
Click Next.
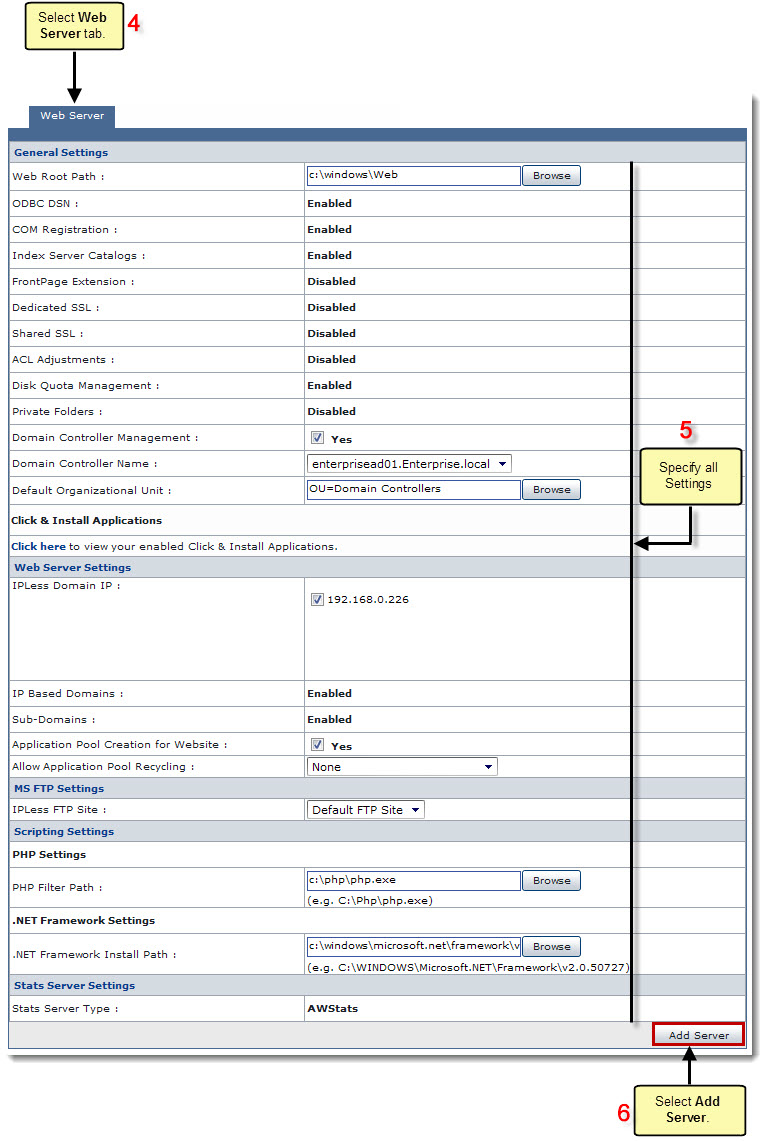
The Web Server Configurations page is displayed.
|
|
To provide all the paths, click Browse and enter the required path. |
Specify the General Settings:
Web Root Path: Enter the path for web root.
|
|
It is the path where HC creates folders for Resellers, Webadmins and Websites of Webadmins. |
|
|
|
Front Page Extension Path: Enter the path for FrontPage Extensions.
|
|
|
Domain Controller Management: Select Yes check box to enable management for the Domain Controller.
Domain Controller Name: Click the arrow and select name of the Domain Controller from the drop-down list box.
|
|
Domain Controller is a server that responds to security authentication requests e.g. logging in, checking permissions, etc. within the Windows Server Domain. |
Default Organizational Unit: Enter path for the Organizational Unit.
|
|
Organizational unit is like directory, where you can place users, groups, computers. If you enable Domain Controller Management, HC uses that Domain Controller/OU to create/manager users/groups. |
|
|
To view your enabled Click & Install Applications, click Click Here. |
Specify the Web Server Settings:
IPLess Domain IP: Select required checkboxes to specify IP addresses for IP less domains.
|
|
|
Application Pool Creation for Website: Select Yes to enable the creation of Application Pool for your website.
|
|
In case of enabling Application Pool Creation, all the users of the websites runs under application pools. It is preferred to create different pools for Resellers and Webadmins so that in case of any breakdown all applications should not stop. |
Allow Application Pool Recycling: Click the arrow and select the required option from the drop-down list box.
|
|
Available options for Allow Application Pool Recycling are:
|
|
|
It is the level to enable Application Pool Recycling at i.e. None/Reseller Only/Webadmins Only/Both Reseller & Webadmins. Whenever a pool is recycled/restarted, it refreshes all the websites running under it. |
Specify the MS FTP Settings:
Select FTP Server: Click the arrow and select the required FTP Server from the drop-down list box.
IPLess FTP Site: Click the arrow and select the required IPLess FTP Site from the drop-down list box.
Specify the Scripting Settings:
PHP Filter Path: Enter path for the PHP Filter.
Perl Install Path: Enter path for Pearl Installation.
.NET Framework Install Path: Enter path for .NET Framework Installation.
|
|
|
Specify the ASP Fusion Settings:
ASP Fusion Install Path: Enter path for ASP Fusion Installation.
Click
Add Server to update the cluster.
A Web Server is added with
the specified information.
Adding A Web Server


Related Links:
|
Web Server (Linux) |
DNS Server (Linux) |
Database Server (Linux) |
Mail Server (Linux) |