|
|
|
|
To add a new server:
Click Server Manager menu and select Global Settings.
Enable roles for the server e.g. Mail role, DNS role, etc. and their corresponding settings.
To add server, click Server Manager menu under General section.
Click Add Server.
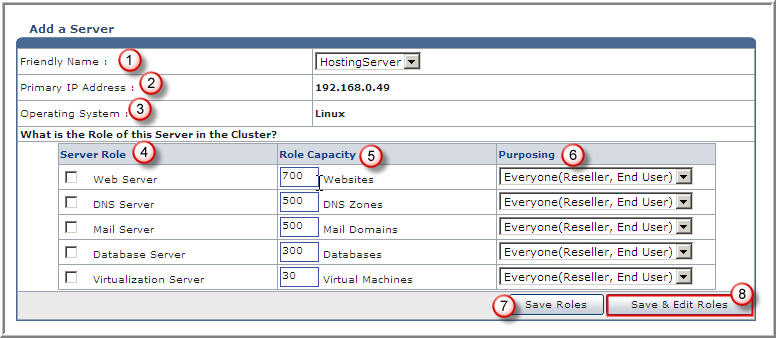
Allocate roles for the Server as per requirement for Web, DNS, Database, Mail and Virtualization Server. To enable each server, select the checkbox for each of the server.
Now click Save and Continue button.

Friendly Name: It is name of the server to be added. It uniquely identifies the server in the cluster.
Primary IP Address: It is the IP Address of the server to be added. Like server name, it is also a unique identifier of the server.
Operating System: It is the operating system of the server to be added.
Server Role: Every server can have one or more role(s) in the cluster. These roles need to be set every time a new server is added to the cluster. Following are the available roles for a server, in the cluster.
Web Server
DNS Server
Mail Server
Database Server
Virtualization Server
Role Capacity: It is the resource capacity on the server for a respective role. It shows the maximum limit of supported websites/DNS Zones/Mail Domains/ Databases on Web/DNS/Mail/Database Server respectively.
Purposing: Every server added in the cluster can be used either for only resellers or for both resellers and shared hosting. Add the end user for the selected server as required.
Every One: (Reseller, End User): It refers to shared hosting.
Reseller Only: It refers to dedicated hosting.
Save Roles: Select to apply the changes.
Save & Edit Roles: Select to apply the changes made on this page and proceed for further steps involved in the addition of the each server separately.
See Also: