|
HOSTING CONTROLLER 8 MANUALS :: Reseller |
|

|
HOSTING CONTROLLER 8 MANUALS :: Reseller |
|
To add a new website:
Click the Domains menu under the General section.
Click the Add Website submenu.
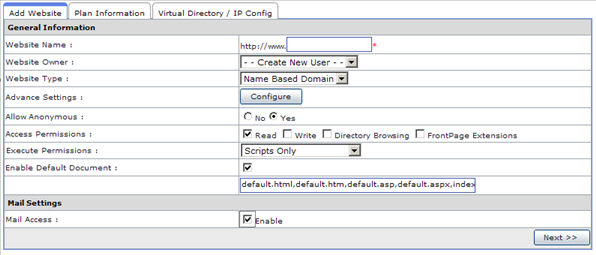
On the add website page provide the following information ad click the Next button.
General Information
Website Name:
Here enter the name of the website.
Website Owner:
Here select the login name of the webadmin, from the drop down menu, for whom you are adding the website. You can also add the website for a new webadmin by selecting the “Create New User” option.
Website Type:
Select the type of the website being added. It can be IP based or Name Based.
To create a website that has its own separate public IP address and the respective HTTP GET requests are resolved by using the IP address instead of the name, then choose the IP based Domain option.
To create a website that shares a single public IP address with other website, then choose the name based domain option. Such websites can not be accessed through IP address directly.
Advanced Settings:
To make the advanced settings for the website, click this button this includes settings like anonymous access, permissions etc.
Allow Anonymous:
Anonymous access, when enabled, allows anyone access without asking for a user name or password. By default anonymous access is ON.
Access Permissions:
You can set a variety of access permissions that apply to the virtual directory as a whole. This can range from only allowing browsers to read the virtual directory right through to allowing browsers to view your directory structure. The following permissions are available. And you can have multiple types of permissions available at a time.
Read
Sites with read access will be displayed to browsers.
Write
Sites with write access can be modified by browsers.
Directory Browsing
Sites with directory browsing access will display the directory structure to browsers.
FrontPage Extensions
Sites with front page extensions will be displayed.
Execute Permissions:
You can set execute permissions that apply to the virtual directory as a whole.
Enable Default Document:
Tick this check box to enable default document for the selected website. A default document tells the web server how to behave when it receives a request for your site that does not specify a specific page. For example, when a web server receives a request for http://yourdomain.com, you can set it to automatically display any document titled default.htm, followed by default.asp, default.html etc., or any other name or type of file you want.
Default Document:
In Default Document box, enter the names of the documents that you want processed first in order, each followed by a comma and no space. e.g. default.htm, default.asp, index.htm, index.asp.
Mail Access:
Tick this check box to enable the mail access for the website.
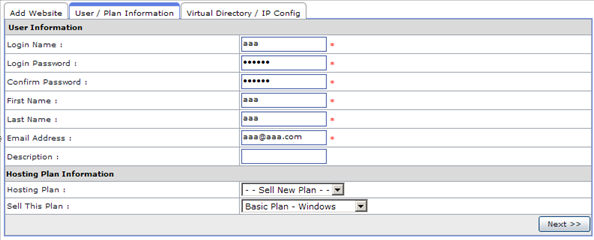
On the User/Plan Information page provide the following information and click the Next button
User Information:
Login Name:
This is the user login name for the site being added.
Login Password:
This is the user login password for the site being added.
Confirm Password:
Specify your password for confirmation.
First Name:
This is the first name of the user.
Last Name:
This is the last name of the user.
Email Address:
This is the email address of the user.
Description:
Specify brief description in this field.
Hosting Plan Information:
Hosting Plan:
This is the hosting plan information for the site being added.
Sell This Plan:
You also have to sell a plan to the new user you have added for the website being added. Select the required plan from the drop down menu to sell to the new user.
On the Virtual Directory/IP Config page provide the following information and click the Next button
Virtual Directory / IP Config:
In case you have selected the IP based option for the website, then you have to select the IP from the drop down menu. If you have selected the name based option you need to select a virtual directory here. And your default selected option selected here would be “Create Temporary Virtual Directory”. Also, select your IP Less Domain IP from the list and select Add Website button.
