
CLICK AND
INSTALL APPS ++
© Hosting
Controller 1998 – 2010. All Rights Reserved.
CLICK AND
INSTALL APPS ++
© Hosting
Controller 1998 – 2010. All Rights Reserved.
Contents
Sections
of Click and Install Apps++:
© 2010 Hosting Controller. All Rights
Reserved.
This
document is the property of, and contains proprietary information of Hosting
Controller. No part of this document may be reproduced or transmitted in any
form or by any means, electronic or mechanical, including photocopying or
recording, for any purpose other than consideration of the technical contents
without the written acquiescence of a duly authorized representative of Hosting
Controller.
|
TERMS/ SYMBOLS |
WHAT THEY MEAN? |
|
BOLD |
The ‘Bold &
UPPERCASE’ text is used to highlight vital terms in the document. |
|
|
This symbol is used
as a sign for NOTE. It reminds about certain noteworthy steps or takes your
attention towards the significant tasks to be done or gives additional
information for your ease. |
|
|
This symbol is used
as a sign for WARNING. It highlights some steps that cannot be skipped or
should be followed as stated to avoid errors and confusion. |
|
|
This symbol is used
to show sample codes related to various XML nodes. |
This
document is intended for those who need to integrate as many “Click and Install
Applications” with HC Control Panel as required. It explains all the
technicalities and functionalities of integrating Click and Install Apps with
the panel.
|
|
|
Click
and Install Apps are external applications that you can install within a single
click. These applications can be web applications or certain scripts that are
installed on a user’s website
In HC CONTROL PANEL these applications can
be easily integrated. Keeping in view the advancements in web technology, HC now offers absolute and
comprehensive support for such applications under the banner of CLICK AND INSTALL APPS ++.
It is an
advanced mold of Click and Install Apps. With the launch of CLICK AND INSTALL APPS ++ you are not
limited to fewer applications. Now, you can integrate any kind of your own web
application as click and install application(s) with HC CONTROL PANEL.
There
are two major parts of Click and Install Apps ++ that are as follows:
It is
the application itself that you want to integrate. It may include database
scripts or anything required to install the product.
It is
the file that contains all the instructions for the control panel to follow while
installing/uninstalling any of the products. This file is in XML format.
There is
no separate installer for Click and Install Apps ++, indeed it is incorporated
in the HC installer. You only have to follow certain steps to add any of the
application in the control panel as follows:
1.
Place any of your
required application in the default location i.e. “…\Advanced Communications\HostingController\Tools”. You can change
the specified location as desired.
2.
To add every product,
you need to generate its GUID e.g. 2f5c5f20-f8d9-414b-9aef-6934c01c3ae0.
3.
Next step is to create
a new folder in the “…\Advanced Communications\HostingController\Tools” folder
with the same name as the GUID. e.g.
…\Advanced
Communications\HostingController\Tools\2f5c5f20-f8d9-414b-9aef-6934c01c3ae0
4.
Now create an XML file
named as “config.xml” and place it in
the folder created in the previous step. Once the XML file is placed, you can
specify the required information/instructions in that.
|
|
|
5.
Once the XML file is
created, now create another folder inside GUID folder with name ‘Files’ and
place your products files in this folder.. e.g.
…\Advanced
Communications\HostingController\Tools\2f5c5f20-f8d9-414b-9aef-6934c01c3ae0\Files
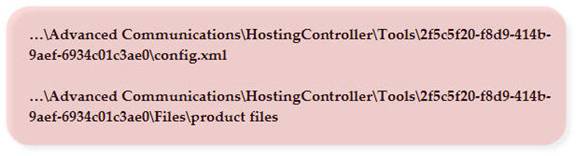
At the completion of these
steps your hierarchy should be as follows:
This document now describes
the basic structure and format for the CONFIG.XML
file for your assistance.
The XML
file consists of certain tags/nodes. A very basic XML file comprises of the
followings:
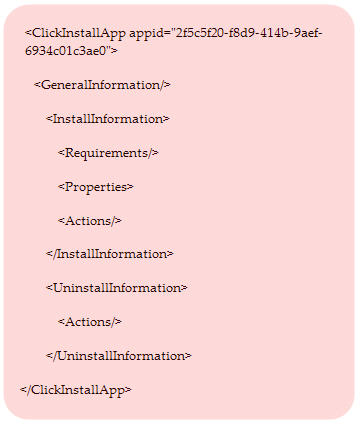
Following
section of this document describes each of these nodes of the XML files with
sample code. XML file is structured into three basic sections such as:
ü
General Information
ü Install Information
ü Uninstall Information
This section contains basic information about the application to
be supported or integrated as new Click
and Install App.
The possible XML nodes for this section are:
1.
Product Name (Required)
It is the name of new Click and Install App that is displayed in the
applications list.
|
|
|
2. Product Description (Required)
It is the short description of the new Click and Install App you are going to
add. It should be a brief explanation about the application.
|
|
|
3. Product Version (Required)
It is the version of Click and Install App you are going to install. It is
needed at the time of version upgrade. This node informs the installer about
the existing version of the application.
|
|
<ProductVersion>1.0.0.0</ProductVersion> |
4. Product Website (Required)
It is the website of Click and Install App that is being installed.
|
|
<ProductWebsite>http://sampleapplication.com</ProductWebsite> |
5.
Product License (Optional)
It allows you to ensure that if the user has agreed to certain terms and
conditions for using and installing this Click and Install App. For some
licensed products, it could be legally required.
|
|
<ProductLicence
acceptgreement="True">sample application terms of use, please
accept to continue.</ProductLicence> |
|
|
|
As it is
an optional node, therefore, if you don’t specify this node then it doesn’t affect
the installation/integration process. But if, you specify this option then whatever
is written in the license agreement that is displayed on the interface.
This
node has one attribute (shown in the above example) as ‘acceptagreement’. It
has two possible values i.e. “True” or “False”. The default value for this
attribute is “True”, if somehow you specify the ‘Product License’ node but didn’t
mention this value then it is assumed to be true. In such case, user has to accept the license
agreement by selecting the checkbox displayed on the interface while the
installation process.
Once, you have specified required information for your application
to be displayed in the list of available applications under a domain. The next
step is to specify set of instructions to tell how to do the actual
installation and also what is required for the users’ domain configuration in
order to run the application. This is the section that contains install
instructions about the product. This section is structured as:
1.
Requirements
This sub section specifies all the requirements for this
application. It allows you to configure the requirements.
|
|
<Database type="MSAccess" version="" /> <Script type="ASP" version="2"
/> |
2.
Properties
This sub section specifies the input parameters that are required to be filled
by the user while installing this application.
|
|
<Properties> |
3.
Actions
Actions are set of instructions to be performed and some system
variables.
This
section specifies the uninstall instructions about the product. Its structure
is sub divided into only one section i.e. <Actions>.
These are
system functions.
This function
is used to copy file(s) from one location to another. You have to specify the
source location (from where the file is copied) and the destination (where the
file is transferred). Its parameters are:
Path: It is the source path from where to copy files. It could
be a folder or a single file to be copied. It is a required parameter.
Targetpath: It is the target location where to
copy the files. It is also a required parameter.
Recursive: Its possible values are True/False. It
is an optional parameter and its default value is ‘True’.
|
|
<CopyFiles path=""
targetpath="" recursive=""/> |
This function
is used to create a file at specified location. You can create file(s) as per
your requirements by specifying its location (where to create the file). You
can also specify whether the content in this file can be over written or not.
If you don’t want this file to be over written then specify “Overwrite = False”
otherwise keep it ‘True’. Its parameters are:
Path: It is the path with file name to be created. It is a
required parameter.
Overwrite: Its possible values are True/False. It
is an optional parameter and its default value is False.
Data: It is the data file. It is an optional parameter. In case
it is not specified then the file is created with empty data.
|
|
<CreateFile path=""
overwrite="">data</CreateFile> |
This function
is used to remove file(s) from a specified location. If you want t o remove any
existing file, you can easily discard that file with this function. The
parameters are:
Path: The path could be a folder/file name to be removed. It’s
a required parameter.
Recursive: Its possible values are True/False. It
is an optional parameter and it default value is False.
|
|
<RemoveFiles path=""
recursive=""/> |
This function
is used to rename specified file/folder. You can change a name of any file as
required with this function.
|
|
|
The parameters
for this function are:
Path: The path could be a folder/file name to be renamed. It is
a required parameter.
Newname: It is the new name. It is a required
parameter.
|
|
<RenameFile path=""
newname=""/> |
This function
is used to search and replace specified text from specified file at all places.
You must find it very time consuming to search out for any content from a long
file. This function allows you to find your required content within any file
and also replace your searched content as needed. The parameters are:
Path: It is the path of the file from where to search. It is a
required parameter.
Search: It is the text to be searched. It is a
required parameter.
Replace: It is the text to be replaced. It is a
required parameter.
|
|
<SearchAndReplace
path="" search="" replace=""/> |
This function
is used to search & replace extension. You can easily find and replace
certain node(s) in the file as required. For that, you just have to specify the
starting & ending text of the node and your content is easily searched and
replaced. The parameters are:
Path: It is the path of the file where to search. It is a
required parameter.
Startnode: It is the start node of the text. It is
a required parameter.
Endnode: It is the end node of the text. It is
a required parameter.
Repeaton: It is the repeat parameters. Its possible
values are MySQL and MSSQL. It is also a required parameter.
|
|
<SearchAndReplaceEx
path="" startnode="" endnode=""
repeaton=""> |
This function
is used to search & replace the specified information. The parameters are:
Search: It is the text to be searched. It is a
required parameter.
Replace: It is the text to be replaced. It is a
required parameter.
|
|
<ReplaceEntry search=""
replace=""/> </SearchAndReplaceEx> |
This function
is used to create virtual directory. You can create your own virtual directory
as required. Specify the name of the directory and the physical path/exact
location where to create the directory. This function creates a virtual
directory as specified. The parameters are:
Name: It is the name of virtual directory to be created. It is
a required parameter.
Path: It is the physical path of virtual directory. It is a
required parameter.
|
|
<CreateVirtualDirectory
name="" path=""/> |
This
function is used to remove virtual directory. It has no parameters for security
purposes. When a virtual directory is created using ‘CreateVirtualDirectory’
function, HC keeps its name in the database and removes virtual directory as
specified. If user has created more than one virtual directory of same name then
this function removes all of them.
|
|
<RemoveVirtualDirectory/> |
This function
is used to create database. You have to specify the name and the login
credentials for the database you are going to create. The parameters are:
Name: It is the name of database. It is a required parameter.
Username: It is the name of user who has owner
rights on the database. It is a required parameter.
Password: It is the password of database user.
It is a required parameter.
|
|
<CreateDatabase name=""
username="" password=""/> |
This
function is used to restore database. Suppose you have mistakenly/intentionally
deleted any information from your existing database or entire database and you
want to restore that; this function allows you to do so. You have to specify
the exact location from where to restore the database file. The parameters are:
Path: It is the path of the file to be
restored. It is a required parameter.
Database
name is not mentioned here for security reasons. When database is created using
‘CreateDatabase’ function, HC keep its name in database and remove same
database. If you want to create and restore multiple databases you have to call
restore database right after the create database. Also, the restore database
works for last created database.
|
|
<RestoreDatabase
path=""/> |
This
function is used to remove database. It has no parameter for security purposes.
When database is created using ‘CreateDatabase’ function, HC keep its name in
database and remove same database. If you have created more than one database
then this function removes all the databases.
|
|
<RemoveDatabase/> |
This function
is used to execute any SQL command on application database. You can execute SQL
commands to retrieve/delete/update some information as per your requirements. It
performs SQL command on last created database. The parameters are:
Path: It is the path of the file where to execute SQL command.
It is a MS Access file and an optional parameter. In case it is not specified
then HC execute SQL command on database which is created through
CreatedDatabase function.
Command: It is the SQL command. It is a
required parameter.
Ignoreerrors: Its possible values are True/False. It
is an optional parameter and it default value is True; that means ignore error
if any.
Timeout: It is the timeout value to execute SQL
command. It is an optional parameter and its default value is 20000. It is the
time in milliseconds.
|
|
<ExecuteSQLCommand
path="" command="" ignoreerrors=""
timeout=""/> |
This function
is sued to launch application in browser after installation. You have to
specify the file to be launched and its login credentials to open the specified
file in the browser as required. The parameters are:
Path: It is the path of file to be launched. It’s a required
parameter. Also when an application is installed successfully, its access URL
is displayed with the login information. You will display this as access URL
Login: It is the login to be displayed on
last page of installation. It is an optional parameter. Don’t display it if it
is not specified.
Password: It is the password to be displayed on
last page of installation. It is an optional parameter. Don’t display it if it
is not specified.
|
|
<LaunchApp path=""
login="" password=""/> |
Following
section of this document provides a list of different variables for your ease
& information.
These variables
are “Application Variables”, “System Variables”, “Input Properties” and
“Database Variables”.
Following is
the list of Application Variables. HC
control panel replaces these variables with the mentioned values if find any of
these variables.
|
VARIABLES |
DESCRIPTION |
|
[$App.Path] |
It is the root
path of the application files. e.g. \Tools\appid\Files |
|
[$App.GenerateRandomPassword] |
It generates a new
random password when it is called. If you want to use this generated password
at multiple places then use the following variable. |
|
[$App.RandomPassword] |
It doesn’t
generate a new password and use the existing one if any. Otherwise, it also
generates a new random password. |
Following is
the list of System Variables. HC
control panel replaces these variables with the mentioned values if find any.
Anything required for the website is retrieved from this section.
|
VARIABLES |
DESCRIPTION |
|
[$Website.Name] |
It is the website name. e.g. domain.com |
|
[$Website.RootPath] |
It is physical root path of the website.
e.g. C:\Webspace\Reseller\Webadmin\ Domain.com |
|
[$Website.DoubleSlashRootPath] |
It is the physical root path of website with
double slashes. e.g. C:\\Webspace\\Reseller\\Webadmin\\ Domain.com |
|
[$Website.ReverseSlashRootPath] |
It is the physical root path of website with
reverse slashes. e.g. C:/Webspace/Reseller/Webadmin/ Domain.com |
|
[$Website.InstallPath] |
It is the install root path of the
application. e.g. C:\Webspace\Reseller\Webadmin\Domain.com\special\myApp |
|
[$Website.DoubleSlashInstallPath] |
It is the install root path of the
application with double slashes. e.g. C:\\Webspace\\Reseller\\Webadmin\\ Domain.com\\special\\myApp |
|
[$Website.ReverseSlashInstallPath] |
It is the install root path of the application
with reverse slashes. e.g C:/Webspace/Reseller/Webadmin/ Domain.com/special/myApp |
|
[$Website.HttpAddress] |
It is the HTTP path of the website. e.g.
http:\\Domain.com |
|
[$Website.OwnerName] |
It is the Owner name from profile. |
|
[$Website.OwnerEmail] |
It is the Owner email address from profile. |
All input
properties can be retrieved from this section.
|
VARIABLES |
DESCRIPTION |
|
[$Property.properties] |
It is the input
properties. |
These are
database variables to access database items.
|
VARIABLES |
DESCRIPTION |
|
[$Database.ServerAddress] |
It is the MySQL or
MS SQL database server IP. |
|
[$Database.ServerName] |
It is the MySQL or
MS SQL database server name. |
|
[$Database.Port] |
It is the MySQL or
MS SQL database server port. |
In case of any ambiguity/query regarding integrating Click and
Install Apps, please feel free to contact us at support@hostingcontroller.com

