
HC FUNDS MANAGER
User Manual
© Hosting Controller 1998 – 2010. All Rights
Reserved.
HC FUNDS MANAGER
User Manual
© Hosting Controller 1998 – 2010. All Rights
Reserved.
Contents
Funds
Manager – Purpose to Launch
Funds
Manager – In Comparison With Plan Manager
Funds
Manager – Resource Management
Funds
Manager – Effect on Existing Customers.
Funds
Manager – Illustration Diagram
Steps
to Follow (For Host Administrator)
Steps
to Follow (For Reseller)
Steps
to Follow (For Webadmin)
© 2010 Hosting Controller. All Rights Reserved.
This document is the property of, and contains proprietary information of Hosting Controller. No part of this document may be reproduced or transmitted in any form or by any means, electronic or mechanical, including photocopying or recording, for any purpose other than consideration of the technical contents without the written acquiescence of a duly authorized representative of Hosting Controller.
|
TERMS/ SYMBOLS |
WHAT THEY
MEAN? |
|
BOLD |
The ‘Bold & UPPERCASE’ text is used to highlight
vital terms in the document. |
|
|
This symbol is used as a sign for NOTE. It reminds
about certain noteworthy steps or takes your attention towards the
significant tasks to be done or gives additional information for your
ease. |
|
|
This symbol is used as a sign for WARNING. It
highlights some steps that cannot be skipped or should be followed as stated
to avoid errors and confusion. |
This document is intended for HOST ADMINISTRATORS/RESELLERS/WEB ADMINISTRATORS who need to have information about HC FUNDS MANAGER. It explains all the technicalities and functionalities of this newly added module in HC in detail. In addition to that, it states all the required steps to ensure flawless management of HC FUNDS MANAGER.
|
|
|
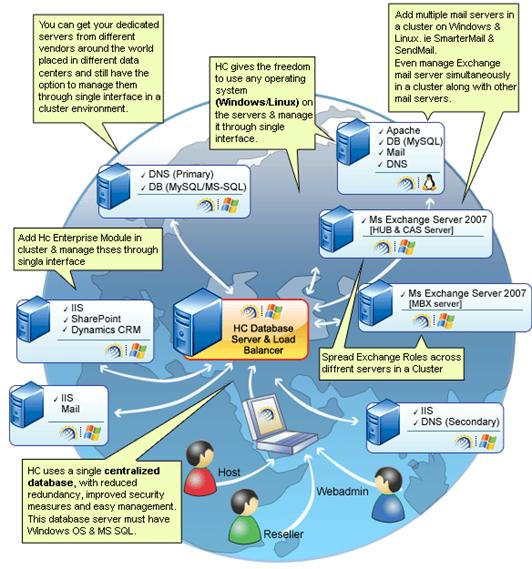
It enables web hosting companies to manage all their servers both Windows & Linux through centralized interface. You can add multiple mail servers within a cluster and offer MS-Exchange & SharePoint hosting. You can expand your business with HC, from one server to cluster of servers. It allows you to add new clusters as per your requirements.
You have to first install it on database server having windows operating system. It can be a standalone server and can have other roles such as Web, Mail and DNS as per your requirements. For further assistance, refer to HC Installation Guide.
Before Installation, you should know the pre-requisites of HC. You have to install Microsoft SQL Server. Instead of this, if you want, you can also download HC installer, in which MSDE is bundled free, depending on your requirements. You have to install Mail Server such as MAIL ENABLE or any other. For websites, you have to install IIS and DNS.
Following figure illustrates working of HC in a cluster environment:
|
|
|
As the name implies – FUNDS MANAGER is a newly added module in HC to manage funds for the clients. It has been introduced with a view point to ensure ease for HOSTS and RESELLERS. It allows them to handle different types of quotas and to restrict their users in terms of usage of the two resources i.e. “Dedicated SSL” and “Domain Registration”.
|
|
|
Previously, these two resources were handled in PLAN MANAGER but the only constraint in that was users cannot be restricted in terms of usage of the above mentioned resources.
For Example: Suppose a scenario in which a RESELLER sells a domain registration quota to a user (WEBADMIN) and want the user to register only ‘.com’ domain for price 50 USD. Since, a RESELLER has not restricted WEBADMIN (as it’s not possible via PLAN MANAGER) so the WEBADMIN registers ‘.net’ domain having price 100 USD.
Now as soon as the registration process is completed, the RESELLER is charged for that from the domain registrant and there is no way RESELLER can get the deducted money back. Thus, FUNDS MANAGER is introduced to allow HOSTS and RESELLERS to manage these two resources in a more effective manner.
In PLAN MANAGER plans are sold to users and their quota is checked on the consumption of resources. While in FUNDS MANAGER funds are allotted to users and they can then use these resources. To check their consumption the remaining funds are monitored.
|
|
|
As stated earlier, the basic purpose of FUNDS MANAGER is to give more control to HOSTS and RESELLERS in terms of resource management.
Now HOSTS and RESELLERS can set the prices of SSL Products / Top Level Domains (TLDs) in terms of funds. In such case, WEBADMINS must have enough funds to order any product or TLD.
For Example: A RESELLER has set a price of 25 USD for a TLD i.e. ‘.com’. Now when a user (WEBADMIN) registers ‘.com’ domain, the remaining funds are checked. The user is not allowed to proceed further, in case of not having required amount of funds i.e. 25 USD. Same scenario applies to SSL Products.
Also more funds can be demanded through the “Get Funds” feature (explained later in this document) provided in the FUNDS MANAGER at RESELLER LEVEL.
|
|
|
As previously domain registration was handled in the PLAN MANAGER section, therefore, users were allowed/restricted to perform any action (let’s say domain registration) on the basis of quotas. The users having enough quota can register domain. Users not having enough quotas get the error message and were not allowed to proceed further.
On the other hand, now all the customers need to purchase funds from their owners i.e. hosts/resellers for domain registration. In case of not having enough funds an error message appears and the user is not allowed to move further until the funds are acquired from the owner.
For Example: A RESELLER sells a plan to WEBADMIN that contains quota for Domain Registration i.e. 5 domain worth of 100 USD (each domain costs 20 USD). Suppose the WEBADMIN has consumed 40 USD i.e. registered 2 domains. Now if the user wants to register 3rd domain, an error message of “Insufficient Funds” is displayed, while 60 USD are still unconsumed.
In such scenario, the user has to ask the owner for enough funds that can compensate those 60 USD. The RESELLER then transfer the funds equal to remaining (60 USD) quota.
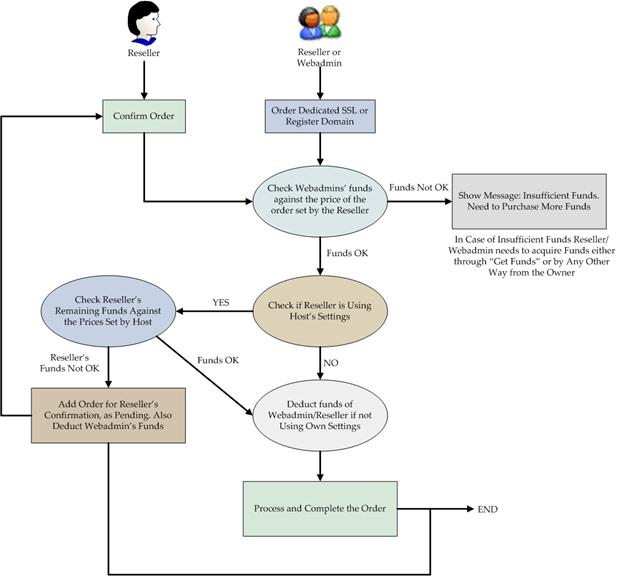
Following figure illustrates the flow and working of FUNDS MANAGER:
|
|
|
To allot and manage funds of your users, follow these steps as stated.
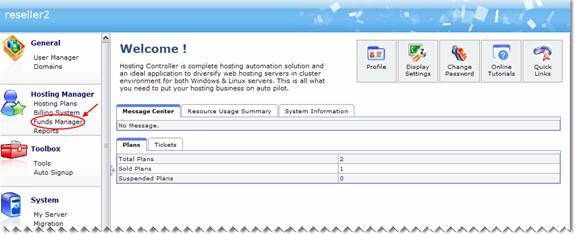
a) Login as HOST ADMINISTRATOR to Control Panel
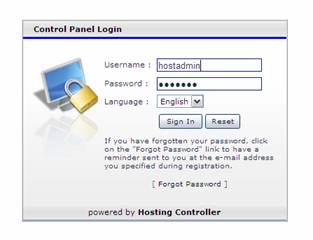
b) After successful login, following screen is displayed:
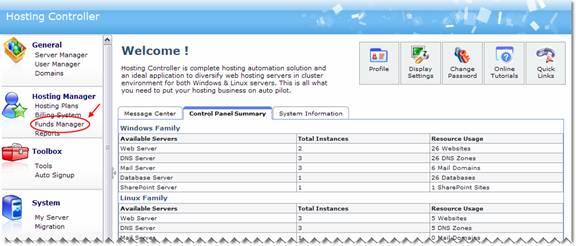
c) Go to “Hosting Manager >> Funds Manager” as highlighted in the previous screenshot. It opens following screen:

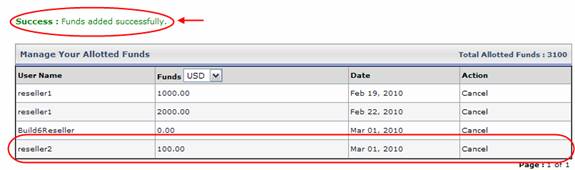
1) My
Funds: It shows entire list of allotted funds and their details.
2) Add
Funds: It allows you to add more funds as per your requirements.
3) User
Name: It shows the user name to whom the fund is allotted.
4) Funds:
It is the total amount of fund allotted.
5) Date:
It is the date of fund allotment.
6) Action:
It allows you to cancel the fund, any time as required.
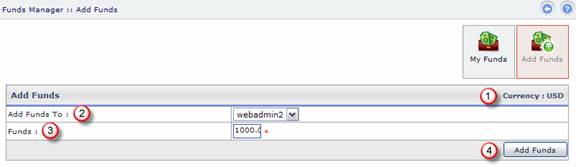
d) Now select “Add Funds”. It opens following screen:
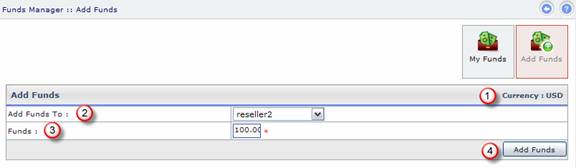
1) Currency:
It is the selected currency to allocate the fund.
2) Add
Funds To: It allows you to select the user i.e. Reseller from the
dropdown list to allot fund as required.
3) Funds:
It is the total amount of fund to be allotted.
4) Add
Funds: It allows you to allot the fund with the specified information.
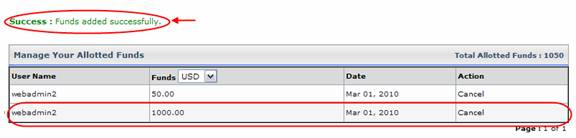
Your new fund is added, as per the specified information:
e) To view detailed reports for all your allotted funds, select “Hosting Manager >> Reports >> Consumed Funds”.
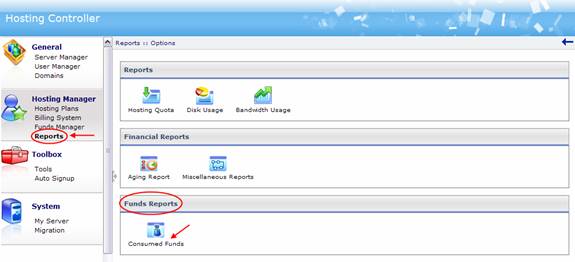
It opens following screen:
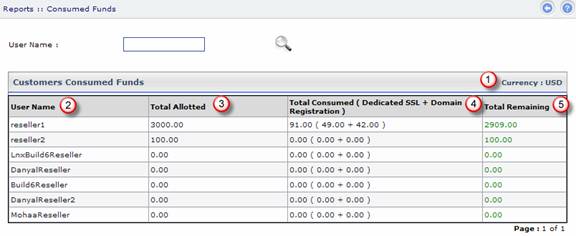
1) Currency:
It is the currency in which the funds are allotted.
2) User
Name: It is the user name to whom funds are allotted.
3) Total
Allotted: These are the total number of funds allotted to the
respective user.
4) Total
Consumed (Dedicated SSL + Domain Registration): These are the total
number of funds used by the respective user.
5) Total
Remaining: It is the total number of funds left with the respective
user.
To acquire, allot and manage funds of your users, login as a RESELLER and follow the steps as stated. The main screen is shown as:
a) Go to “Hosting Manager >> Funds Manager” as highlighted in the previous screenshot. It opens following screen:
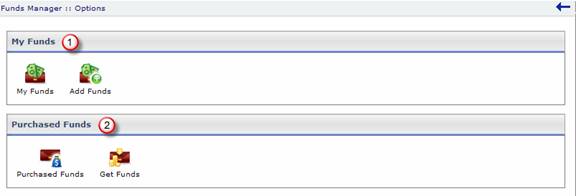
1) My
Funds: This section deals with the funds allotted to the users i.e.
Webadmins.
2) Purchased
Funds: This section deals with
the funds acquired from the hosts.
|
|
|
b) Select “My Funds”, it opens the following screen:

1) My
Funds: It shows entire list of allotted funds and their details.
2) Add
Funds: It allows you to add more funds as per your requirements.
3) User
Name: It shows the user name to whom the fund is allotted.
4) Funds:
It is the total amount of fund allotted.
5) Date:
It is the date of fund allotment.
6) Action:
It allows you to cancel the fund, any time as required.
|
|
|
c) Select “Add Funds”. It opens following screen:
1) Currency:
It is the selected currency to allocate the fund.
2) Add
Funds To: It allows you to select the user i.e. Webadmin from the
dropdown list to allot fund as required.
3) Funds:
It is the total amount of fund to be allotted.
4) Add
Funds: It allows you to allot the fund with the specified information.
Your new fund is added, as per the specified information:
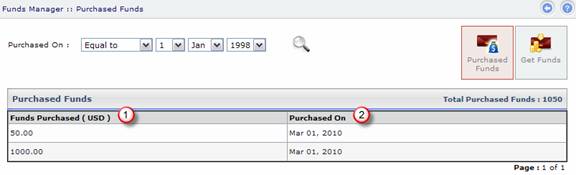
d) To manage the funds you acquired from the HOST ADMINISTRATOR, go to “Purchased Funds”. It opens following screen:
1) Purchased
Funds: It shows entire list of allocated funds to the reseller.
2) Get
Funds: It allows you to request for more funds from the host as per
your requirements.
3) Funds
Purchased (USD): It shows the total amount of fund acquired/bought from
the host administrator.
4) Purchased
On: It shows the date of funds allotment.
e) Select “Get Funds”. It opens the following screen:

1) Personal
Information: Specify your personal information in this section.
2) Payment
Details: Specify your payment details in this section. Select “Payment
Method” from the dropdown list as required. You can view your remaining fund
amount as well. Keeping that in view, specify the amount to be acquired more as
per your requirements.
3) Get
Funds: It allows you to request for more funds as required.
f) To view detailed reports for all your funds, select “Hosting Manager >> Reports >> Consumed Funds”.

It opens following screen:
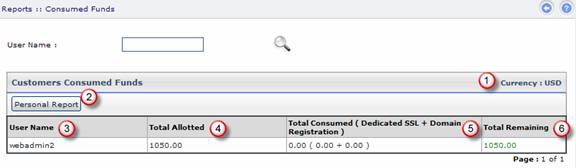
1) Currency:
It is the currency in which the funds are allotted.
2) Personal
Report: It allows you to have a detailed view of the report in terms of
funds and their usage.
3) User
Name: It is the user name to whom funds are allotted.
4) Total
Allotted: These are the total number of funds allotted to the
respective user.
5) Total
Consumed (Dedicated SSL + Domain Registration): These are the total
number of funds used by the respective user.
6) Total
Remaining: It is the total number of funds left with the respective
user.
To view your acquired funds, login as a WEBADMIN and follow the steps as stated. The main screen is shown as:
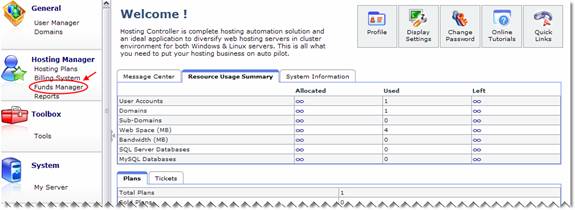
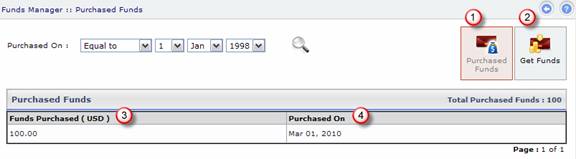
a) Go to “Hosting Manager >> Funds Manager” as highlighted in the previous screenshot. It opens following screen:
1) Funds
Purchased (USD): It shows the total amount of funds acquired/bought
from the RESELLER.
2) Purchased
On: It shows the date of funds allotment.
b) To view detailed reports for all your funds, select “Hosting Manager >> Reports >> Consumed Funds”. It opens following screen:
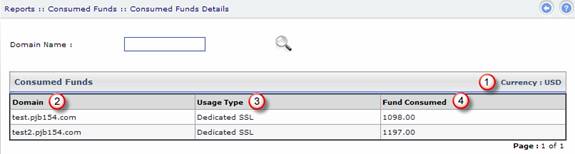
1) Currency:
It is the currency in which the funds are allotted.
2) Domain:
It is the domain name.
3) Usage
Type: It is the usage type of the allotted fund i.e. Dedicated SSL.
4) Fund Consumed:
These are the total number of funds used.
In case of any ambiguity/query regarding HC FUNDS MANAGER module, please feel free to contact us at support@hostingcontroller.com