
HC DYNAMICS CRM SERVER
User Manual
© Hosting Controller 1998 – 2009. All Rights
Reserved.
HC DYNAMICS CRM SERVER
User Manual
© Hosting Controller 1998 – 2009. All Rights
Reserved.
Contents
© 2009 Hosting Controller. All Rights Reserved.
This document is the property of, and contains proprietary information of Hosting Controller. No part of this document may be reproduced or transmitted in any form or by any means, electronic or mechanical, including photocopying or recording, for any purpose other than consideration of the technical contents without the written acquiescence of a duly authorized representative of Hosting Controller.
|
TERMS/ SYMBOLS |
WHAT THEY
MEAN? |
|
BOLD |
The ‘Bold & UPPERCASE’ text is used to highlight
vital terms in the document. |
|
|
This symbol is used as a sign for NOTE. It reminds
about certain noteworthy steps or takes your attention towards the
significant tasks to be done or gives additional information for your
ease. |
|
|
This symbol is used as a sign for WARNING. It
highlights some steps that cannot be skipped or should be followed as stated
to avoid errors and confusion. |
This document is intended for HOST ADMINISTRATORS/RESELLERS/WEB ADMINISTRATORS who need to install, configure and manage Dynamics CRM Server with HC. It explains all the technicalities and functionalities of server configuration in detail. In addition to that, it also states the required steps to ensure flawless working of Dynamics CRM Server with HC.
|
|
|
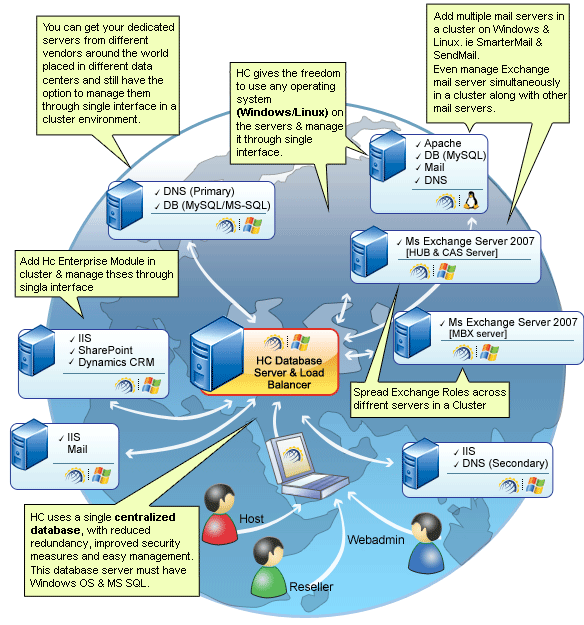
It enables web hosting companies to manage all their servers both Windows & Linux through centralized interface. You can add multiple mail servers within a cluster and offer MS-Exchange & SharePoint hosting. You can expand your business with HC, from one server to cluster of servers. It allows you to add new clusters as per your requirements.
You have to first install it on database server having windows operating system. It can be a standalone server and can have other roles such as Web, Mail and DNS as per your requirements. For further assistance, refer to HC Installation Guide.
Before Installation, you should know the pre-requisites of HC. You have to install Microsoft SQL Server. Instead of this, if you want, you can also download HC installer, in which MSDE is bundled free, depending on your requirements. You have to install Mail Server such as Mail Enable or any other. For websites, you have to install IIS and DNS.
Following figure illustrates working of HC in a cluster environment:
Dynamics CRM has transformed the way many companies secure and retain their most valuable asset: loyal, satisfied customers. From global enterprise to small business, companies are quick to capitalize on the familiar and flexible functionality offered by the only CRM solution that works inside Microsoft Office Outlook.
Microsoft Dynamics CRM workflow automation and analytics let your Sales, Marketing and Service staff easily share information and route tasks to provide a seamless customer experience.
Microsoft Dynamics CRM is flexible, familiar and fits your business. Unlike other CRM solutions, it gives you a choice in two key areas:
Ø Easily switch options if your needs change.
Ø Use it within Microsoft Office Outlook, a Web browser, a custom portal, a Microsoft Office SharePoint portal, or a mobile device.
|
|
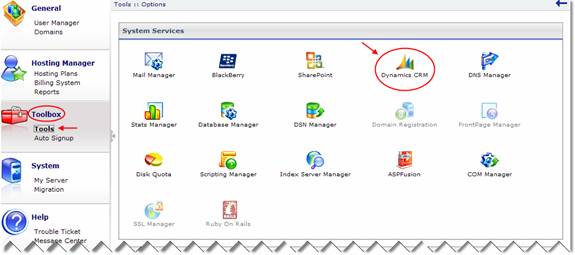
To configure Dynamics CRM with HC
panel, first of all install HC
on Dynamics CRM Server as a Subsequent Server. |
|
|
|
Once you have installed HC on Dynamics CRM Server, you need to configure the entire setup. You have to follow these steps as stated, to omit faults & errors during Dynamics CRM Server configuration.
Configuration of Dynamics CRM Server comprises of mainly two steps i.e. Enable Dynamics CRM Server and Add Dynamics CRM Server. Later sections of this document describe each of them in detail.
Follow these steps to enable Dynamics CRM Server for your cluster.
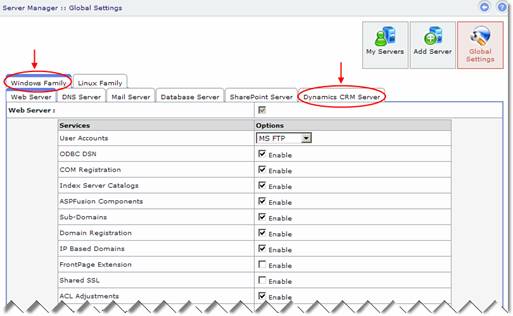
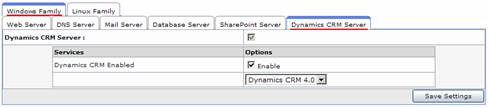
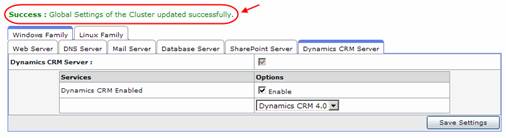
Enable Dynamics CRM Server by checking the checkbox and then enable its service by selecting the second checkbox. Select your required options from the list and select “Save Settings”. It updates the changes and enables Dynamics CRM Server for your cluster as shown below:
To make your server a Dynamics CRM Server, you have to add a server and assign it a role such as Dynamics CRM Server. Follow these steps to make your server a Dynamics CRM Server.
It opens following screen:
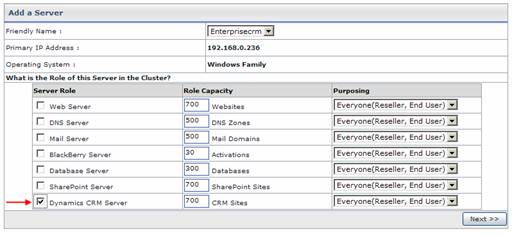
§
Friendly Name:
It is the list of available servers; you can select
one as per your requirements.
§
Primary IP Address:
It is the unique IP Address of the selected Server.
§
Operating System:
It shows the supported operating system.
§
Server Role:
It allows you to select role for the server, you
are going to add.
§
Role Capacity:
It shows the maximum limit of supported
domains/DNS/mail domains/databases/CRM Sites on Web/DNS/Mail/Database/Dynamics
CRM Server respectively.
§
Purposing:
It allows you to specify end user for the selected
server. You can dedicate your server to only resellers as well as to everyone
according to your requirements.
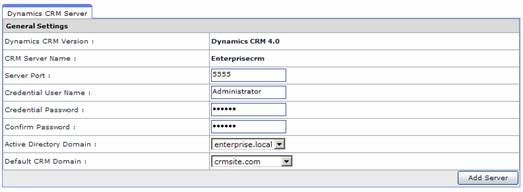
§
Dynamics CRM Version:
It is CRM version.
§
CRM Server Name:
It is the name of the server where Dynamics CRM and
HC are installed.
§
It is the port that is defined while installing
Dynamics CRM Server. Usually it is 5555 as suggested by the CRM Installer.
§
Credential User Name:
Specify user name in this field. This user can
access the CRM server. It should be an Active Directory User and Dynamics CRM
Deployment Administrator.
§
Credential Password:
Specify password in this field.
§
Confirm Password:
Re-type the password for confirmation.
§
Active Directory Domain:
Select active directory domain for credential user
from the list as required.
§
Default CRM Domain:
Select default CRM domain from the list as
required.
|
|
|
Select “Add Server” to apply the changes. It adds a
Dynamics CRM Server with the specified information.
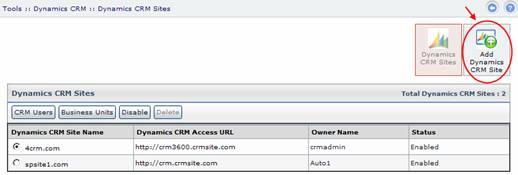
In order to manage Dynamics CRM Sites (Organizations), users and Business Units, logon as a Reseller/Web Admin and follow these steps as stated:
|
|
|

§
Select Website:
Select your required website from the list under which you are going to create the CRM site.
§
CRM Site Name:
Specify name of the CRM site, you are going to add.
Select “Add CRM Site”. It adds the site with the specified information.
|
|
|
You can add other CRM sites as well in the same way as stated.
Dynamics CRM Sites have their own CRM USERS. In order to create a new user/to view the existing users, select your required CRM Site and then select “CRM Users” button as shown below:
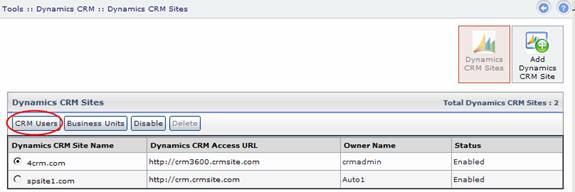
Selecting “CRM Users” opens following screen:
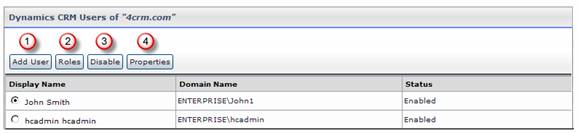
These are the existing CRM Users for the selected CRM Site.
1. Add User: It
allows you to add a new user for the selected CRM Site as shown below:
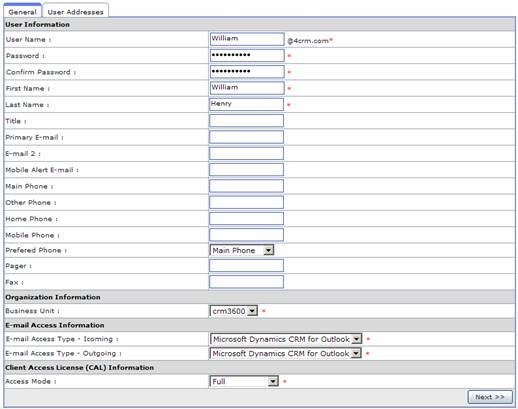
Specify the required information and then select “Next”. It opens following screen:
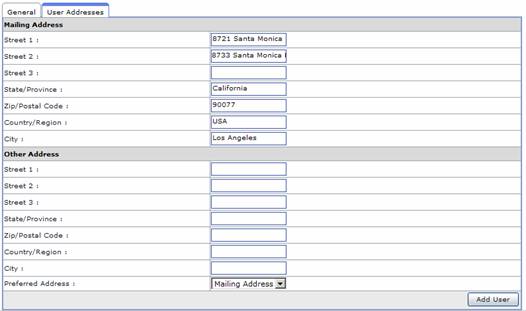
Specify information in the fields as required and select “Add User”. It adds a new user for the selected CRM Site.
2. Role: It allows you to assign role(s) to the selected CRM User as:

Select the checkboxes against each role to assign role(s) to the selected user as required and then select “Update Role”. It updates role(s) of the selected user as specified.
3. Disable/Enable: It allows you to enable or disable any user or multiple users as per your requirements. Selecting “Disable” button disables the selected user as shown below:
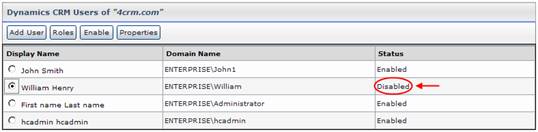
Select “Enable” button to enable any disabled user as required.
4. Properties: It shows the information of the user that you have specified while adding the selected user. You can edit the information as required. Once you update the information, select “Update User” to apply he changes.
HC allows you to manage BUSINESS UNITS for each Dynamics CRM Site as per your requirements. In order to create a new BU/to view the existing BUs, select your required CRM Site and then select “Business Units” button as shown below:

Selecting “Business Units” opens following screen:

These are the existing Business Units for the selected CRM Site.
1.
Add Business Unit: It allows you to
add a new Business Unit for the selected CRM site as required.

Specify information as required and select “Next”. It opens following screen:
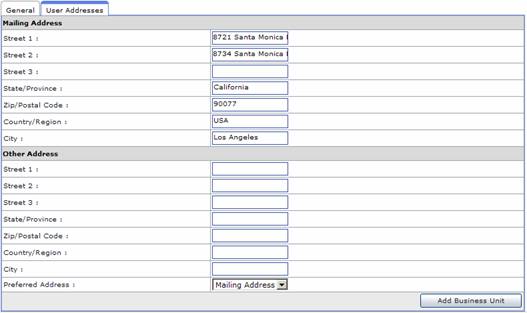
Specify information as per your requirements and select “Add Business Unit”. It adds a new business unit with the specified information.
2.
Disable: It allows you to enable or
disable any BU as per your requirements.
In case of any ambiguity/query regarding HC and Dynamics CRM configurations, please feel free to contact us at support@hostingcontroller.com