|
HOSTING CONTROLLER 7C MANUALS :: Reseller |
|

|
HOSTING CONTROLLER 7C MANUALS :: Reseller |
|
A reseller can add as many users as required as long as the the quota allows. The user a reseller add is a webadmin. Once a webadmin user has been added, the reseller can then create a new domain for that user, as required.
To add a new user:
Click the User Manager menu under the General section.
Click the Add User submenu.
Provide the following information as required and press the Add User button at the end:
General Information:
This is the general information related to the user to be added. This includes introductory data about the user.
Login Name:
This is the login name of the webadmin. This will be used to access the panel.
Login Password:
The webadmin has to provide a password to have access to the panel. The login name is visible, but the password is not visible. It is a set of secret characters. It is recommended that password should consist of a combination of letters and numbers.
Confirm Password:
Here re-type the password you have provided in the above field.
Description:
This is any extra information you like to add about your user to make it more descriptive.
Disable User:
Tick this check box if you want to disable the account of this user. This is normally done in case the user has pending invoices or has not paid any due payments.
Hosting Plan Information:
This is information related to the hosting plan of the user to be added.
Hosting Plan:
Here you can select the plan for the user from the drop down menu.

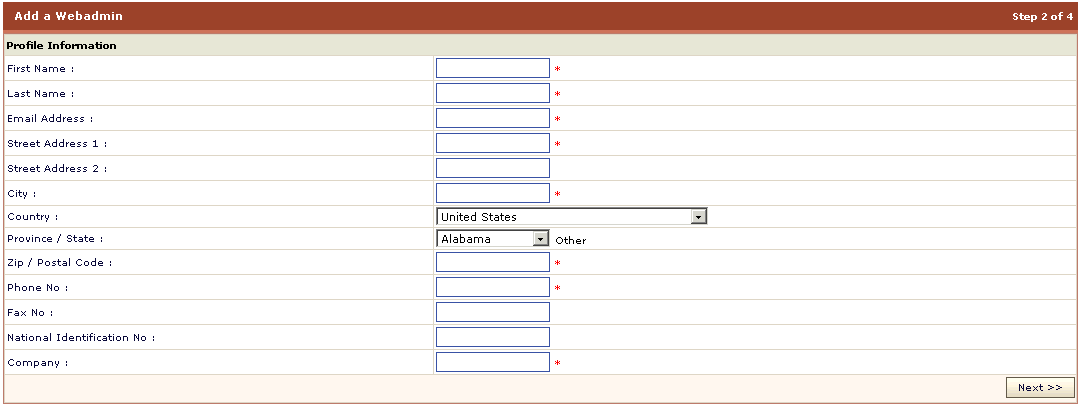
Profile Information:
This is the profile information for the user. It has all the information related to the profile of the user and includes personal information like name address zip code etc.
First Name:
This is the first name of the webadmin you are currently adding.
Last Name:
This is the last name of the webadmin you are currently adding.
Email Address:
This is the email address of the webadmin to be added. This should be a valid email address as it is used for all the official email correspondence. Important announcements are sent on this address. Also the new password email is sent on this address.
Street Address 1:
This is the street address of the webadmin you are currently adding.
Street Address 2:
This is optional second street address.
City:
Here enter the city of the webadmin.
Country:
Here enter the country of the webadmin you are currently adding.
Province/State:
Here type the state or province of the webadmin.
ZIP/Postal Code:
Here provide the ZIP/ Postal code of the webadmin.
Phone Number:
Here type the phone number of the webadmin.
Fax Number:
Here type the fax number for the webadminto be added. This entry is not mandatory.
Social Security Number:
Here enter the social security number for the webadmin.
Company:
This is the name of the company of your webadmin.
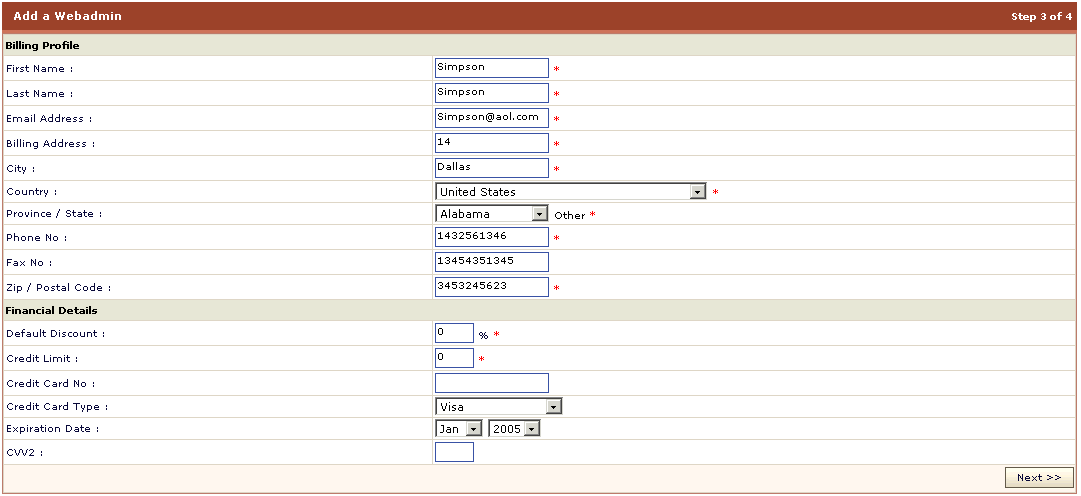
Billing Profile:
This is the billing profile. If you have enabled the billing, then you will be displayed with these pages. For your ease the panel automatically picks the billing information from the profile information, and saves you from refilling the information.
First Name:
This is the first name of the webadmin, it is same the one you have provided in the user profile.
Last Name:
This is the last name of the webadmin, it is also same that you have provided in the user profile.
Email Address:
This is the email address of the webadmin to be added. This should be a valid email address as it is used for all the financial email correspondence with your host.
Billing Address 1:
This is the street address of the webadmin.
City:
This is the provided city of the webadmin.
Country:
This is the provided country of the webadmin.
Province /State:
This is the state or province of the webadmin.
ZIP / Postal Code:
This is the ZIP/ Postal code of the webadmin.
Phone Number:
This is the phone number of the webadmin.
Fax Number:
This is the fax number for the reseller.
Financial Details:
Following are the financial details for the webadmin. And it consists of Default Discount, Credit Limit, Credit Card No, Credit Card Type, Expiration Date, and CVV2
Default Discount:
This is the discount you wish to give to your new webadmin on each hosting plan. For example, if you enter '5' then 5% discount will be given on each recurring billing cycle. Enter 0 if you don't want to give any discount.
Credit Limit:
If you give the credit limit to the webadmin, he can buy a new plan without the need of a credit card. The available credit limit decreases automatically when user has outstanding payments or when he buys a new plan. You can also leave it as 0
Credit Card No:
Enter the credit card number of the webadmin. The credit card number is stored in a strong encrypted form.
Credit Card Type:
Select the credit card type from the drop down menu. It is required during the online payment procedure.
Expiration Date:
Enter the expiration date of your credit card.
CVV2:
Here give the Credit Card Verification Value 2 number, the three digit number found at the back of your card.
Now if you have enabled auto- billing, the panel will ask if you want to auto bill for the newly made user. If you want to enable the auto billing Auto-Billing is also known as recurring billing. It enables the customers to automatically pay the invoice as soon as it gets created. tick the Enable Auto Billing and Enable Invoicing check boxes under the Billing Configuration section and click the Add Webadmin button.

Now press the add user button.