|
|
|
|
Adding a DNS Server
To add a DNS server:
Log on to HC panel.
From
the left menu click General, and
then Server Manager.
The Server Manager page is displayed.
Click
Add Server.
The Add Server page is displayed.
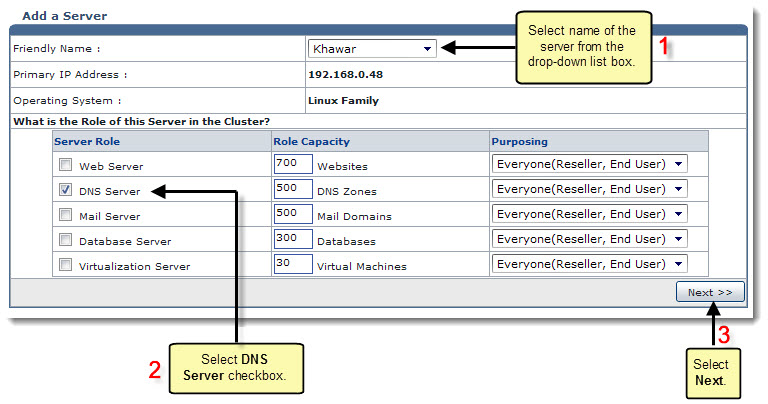
Click the Friendly Name arrow and select the required server from the drop-down list box.
|
|
|
Under
Server Role, select the DNS Server check box.
|
|
Every server can have one or more role(s) in the cluster. These roles need to be set every time a new server is added to the cluster. |
Under Role Capacity, type the number of DNS Zones supported by the server.
Under Purposing, click the arrow and select the end user for the server.
|
|
The server role added in the cluster can be used either dedicatedly for a Reseller or for shared hosting. A role dedicated to a Reseller can not be used for any other user. |
|
|
|
Click Next.
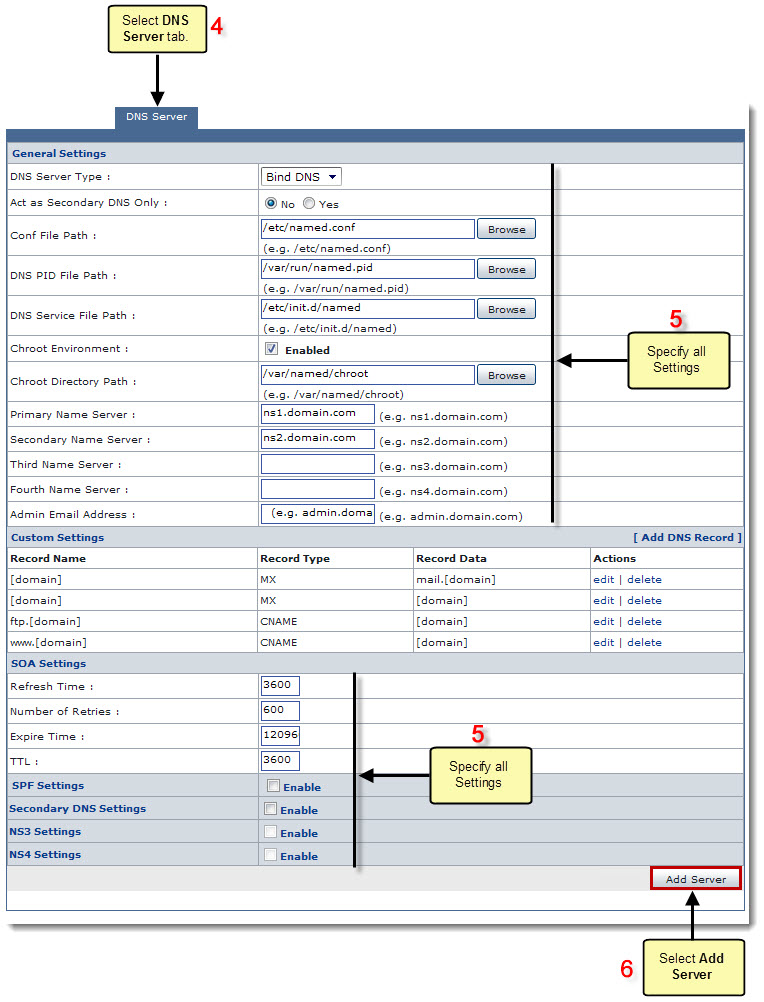
The DNS Server Configurations page is displayed.
|
|
To provide all the paths, click Browse and enter the required path. |
Specify the General Settings:
DNS Server Type: Click the arrow and select the type of DNS Server from the drop-down list box.
Act as Secondary DNS Only: Select Yes to make this server only the Secondary DNS Server. Otherwise, select No.
CONF File Path: Enter path for the CONF File.
DNS PID File Path: Enter path for the DNS PID File.
DNS Service File Path: Enter path for the DNS Service File.
Primary Name Server: Type name of the Primary Server.
|
|
For Example: server1.hostingcontroller.com |
Secondary Name Server: Type name of the Secondary Server.
|
|
For Example: server2.hostingcontroller.com |
Third Name Server: Type name of the Third Server.
|
|
For Example: server3.hostingcontroller.com |
Fourth Name Server: Type name of the Fourth Server.
|
|
For Example: server4.hostingcontroller.com |
Admin Email Address: Type the email address of the Administrator.
|
|
For Example: administrator.hostingcontroller.com |
|
|
|
|
|
|
Specify SOA Settings:
|
|
SOA Settings specify authoritative information about a DNS zone, including the primary name server, the email of the domain administrator, the domain serial number, and several timers relating to refreshing the zone. |
Refresh Time: Type the time to refresh SOA Settings.
Number of Retries: Type the number of seconds, after which a retry is made to refresh the SOA Settings.
Expire Time: Type the time of expiry.
TTL: Type the time period for TTL.
|
|
The units used for TTL (Time to Live) are seconds. A common TTL value for DNS is 86400 seconds, which is 24 hours. A TTL value of 86400 would mean that if a DNS record was changed, DNS servers around the world could still be showing the old value from their cache for up to 24 hours after the change. |
Specify SPF Settings:
|
|
SPF (Sender Policy Framework) is used to stop spam from being sent using unauthorized domain names. It can only stop the spammer for the From field in the e-mail and not from sending e-mails from any of its member domain. |
SPF Settings: Select the Enable check box to apply SPF Settings on the server.
SPF Record: Type the SPF information.
|
|
The domain which is sending emails must have an established SPF record entry in DNS. Its default value is automatically given but you can change this value if required. |
Specify Secondary DNS Settings:
Secondary DNS Settings: Select the Enable check box to apply Secondary DNS Settings on the server.
Secondary DNS Server: Click the arrow and select the Secondary DNS Server from the drop-down list box.
Specify NS3 Settings:
NS3 Settings: Select the Enable check box to apply NS3 Settings on the server.
Secondary DNS Server: Click the arrow and select the Secondary DNS Server from the drop-down list box.
Specify NS4 Settings:
NS4 Settings: Select the Enable check box to apply NS4 Settings on the server.
Secondary DNS Server: Click the arrow and select the Secondary DNS Server from the drop-down list box.
Click
Add Server to update the cluster.
A DNS Server is added with
the specified information.
Adding a DNS Server
Related Links:
|
Web Server (Linux) |
Database Server (Linux) |
Mail Server (Linux) |
![]()
|
© Hosting Controller 1998-2011. All Rights Reserved |


